Pages

Monday, 25 June 2012


Oracle Enterprise Manager Configuration

1.      create the repository

$ emca -config dbcontrol db -repos create

                
Dec 2, 2005 7:35:01 PM oracle.sysman.emcp.EMReposConfig createRepository
                INFO: Creating the EM repository (this may take a while) ...
                Dec 2, 2005 7:35:01 PM oracle.sysman.emcp.EMReposConfig createRepository
                CONFIG: ORA-20001: SYSMAN already exists..
                ORA-06512: at line 17

oracle.sysman.assistants.util.sqlEngine.SQLFatalErrorException: ORA-20001: SYSMAN already exists..
                ORA-06512: at line 17

                                at oracle.sysman.assistants.util.sqlEngine.SQLEngine.executeImpl(SQLEngine.java:1474)
                                at oracle.sysman.assistants.util.sqlEngine.SQLEngine.executeScript(SQLEngine.java:848)
                at oracle.sysman.assistants.util.sqlEngine.SQLPlusEngine.executeScript(SQLPlusEngine.java:267)
at oracle.sysman.assistants.util.sqlEngine.SQLPlusEngine.executeScript(SQLPlusEngine.java:308)
                                at oracle.sysman.emcp.EMReposConfig.createRepository(EMReposConfig.java:422)
                                at oracle.sysman.emcp.EMReposConfig.invoke(EMReposConfig.java:192)
                                at oracle.sysman.emcp.EMReposConfig.invoke(EMReposConfig.java:134)
                                at oracle.sysman.emcp.EMConfig.perform(EMConfig.java:171)
                                at oracle.sysman.emcp.EMConfigAssistant.invokeEMCA(EMConfigAssistant.java:486)
                at oracle.sysman.emcp.EMConfigAssistant.performConfiguration(EMConfigAssistant.java:1142)
                                at oracle.sysman.emcp.EMConfigAssistant.statusMain(EMConfigAssistant.java:470)
                                at oracle.sysman.emcp.EMConfigAssistant.main(EMConfigAssistant.java:419)
                Dec 2, 2005 7:35:01 PM oracle.sysman.emcp.EMReposConfig invoke
                SEVERE: Error creating the repository
                Dec 2, 2005 7:35:01 PM oracle.sysman.emcp.EMReposConfig invoke
INFO: Refer to the log file at /opt/app/oracle/oracle/product/10.2.0/db_1/cfgtoollogs/emca/DBACLASS/emca_repos_create_<date>.log for more details.
                Dec 2, 2005 7:35:01 PM oracle.sysman.emcp.EMConfig perform
                SEVERE: Error creating the repository
Refer to the log file at /opt/app/oracle/oracle/product/10.2.0/db_1/cfgtoollogs/emca/DBACLASS/emca_2005-12-02_07-34-42-PM.log for more details.
                Dec 2, 2005 7:35:01 PM oracle.sysman.emcp.EMConfig perform
                CONFIG: Stack Trace:
                oracle.sysman.emcp.exception.EMConfigException: Error creating the repository
                                at oracle.sysman.emcp.EMReposConfig.invoke(EMReposConfig.java:204)
                                at oracle.sysman.emcp.EMReposConfig.invoke(EMReposConfig.java:134)
                                at oracle.sysman.emcp.EMConfig.perform(EMConfig.java:171)
                                at oracle.sysman.emcp.EMConfigAssistant.invokeEMCA(EMConfigAssistant.java:486)
                                at oracle.sysman.emcp.EMConfigAssistant.performConfiguration(EMConfigAssistant.java:1142)
                                at oracle.sysman.emcp.EMConfigAssistant.statusMain(EMConfigAssistant.java:470)


2.       As the database is created manually, the SYSMAN user and some other users like MGMT_USER and synonyms already exists in the database. So, they should be dropped   before the repository is created. If the user is not dropped the previous error will occur.

 Drop the SYSMAN user along with the other user and roles as follows:

                   SQL> drop user sysman cascade;
                   User dropped.

                   SQL> DROP USER mgmt_view;
                   User dropped.

                   SQL> DROP PUBLIC SYNONYM mgmt_target_blackouts;
                   Synonym dropped.

                   SQL> DROP ROLE mgmt_user;
                   Role dropped.

                   SQL> DROP PUBLIC SYNONYM setemviewusercontext;
                   Synonym dropped.


3.       Now create the repository and configure the database control at a time with the below command.
                It prompts for the passwords. The passwords should be given in the double quotes.

$ emca -config dbcontrol db -repos create
               
STARTED EMCA at Dec 2, 2005 9:21:32 PM
                EM Configuration Assistant, Version 10.2.0.1.0 Production
                Copyright (c) 2003, 2005, Oracle.  All rights reserved.

                Enter the following information:
                Database SID: DBACLASS
                Database Control is already configured for the database DBACLASS
                You have chosen to configure Database Control for managing the database DBACLASS
                This will remove the existing configuration and the default settings and perform a fresh configuration
                Do you wish to continue? [yes(Y)/no(N)]: y
                Listener port number: 1521
                Password for SYS user: 
                Password for DBSNMP user: 
                Password for SYSMAN user: 
                Email address for notifications (optional): venkat.tadi@abacus-concepts.com
                Outgoing Mail (SMTP) server for notifications (optional):
                -----------------------------------------------------------------

                You have specified the following settings

                Database ORACLE_HOME ................ /opt/app/oracle/oracle/product/10.2.0/db_1

                Database hostname ................ dg2.abacus.com
                Listener port number ................ 1521
                Database SID ................ DBACLASS
                Email address for notifications ............... venkat.tadi@abacus-concepts.com
                Outgoing Mail (SMTP) server for notifications ...............

                -----------------------------------------------------------------
                Do you wish to continue? [yes(Y)/no(N)]: y
                Dec 2, 2005 9:22:26 PM oracle.sysman.emcp.EMConfig perform
                INFO: This operation is being logged at /opt/app/oracle/oracle/product/10.2.0/db_1/cfgtoollogs/emca/DBACLASS/emca_2005-12-02_09-21-32-PM.log.
                Dec 2, 2005 9:22:27 PM oracle.sysman.emcp.util.DBControlUtil stopOMS
                INFO: Stopping Database Control (this may take a while) ...
                Dec 2, 2005 9:22:30 PM oracle.sysman.emcp.EMReposConfig createRepository
                INFO: Creating the EM repository (this may take a while) ...
                Dec 2, 2005 9:24:14 PM oracle.sysman.emcp.EMReposConfig invoke
                INFO: Repository successfully created
                Dec 2, 2005 9:24:18 PM oracle.sysman.emcp.util.DBControlUtil secureDBConsole
                INFO: Securing Database Control (this may take a while) ...
                Dec 2, 2005 9:26:50 PM oracle.sysman.emcp.util.DBControlUtil secureDBConsole
                INFO: Database Control secured successfully.
                Dec 2, 2005 9:26:50 PM oracle.sysman.emcp.util.DBControlUtil startOMS
                INFO: Starting Database Control (this may take a while) ...
                Dec 2, 2005 9:28:28 PM oracle.sysman.emcp.EMDBPostConfig performConfiguration
                INFO: Database Control started successfully
                Dec 2, 2005 9:28:28 PM oracle.sysman.emcp.EMDBPostConfig performConfiguration
                INFO: >>>>>>>>>>> The Database Control URL is https://dg2.abacus.com:1158/em  <<<<<<<<<<<
                Enterprise Manager configuration completed successfully
                FINISHED EMCA at Dec 2, 2005 9:28:28 PM


             4.       Now the OEM is successfully installed and configured. To check status of the dbconsole:

                 $ emctl status dbconsole         
               
                TZ set to Asia/Calcutta
                Oracle Enterprise Manager 10g Database Control Release 10.2.0.4.0 
                Copyright (c) 1996, 2007 Oracle Corporation.  All rights reserved.
                https://dg2.abacus.com:1158/em/console/aboutApplication
                Oracle Enterprise Manager 10g is running.
                ------------------------------------------------------------------
                Logs are generated in directory /opt/app/oracle/oracle/product/10.2.0/db_1/dg2.abacus.com_DBACLASS/sysman/log
               
               
                It shows that the OEM is running. We can check it from the client machine.


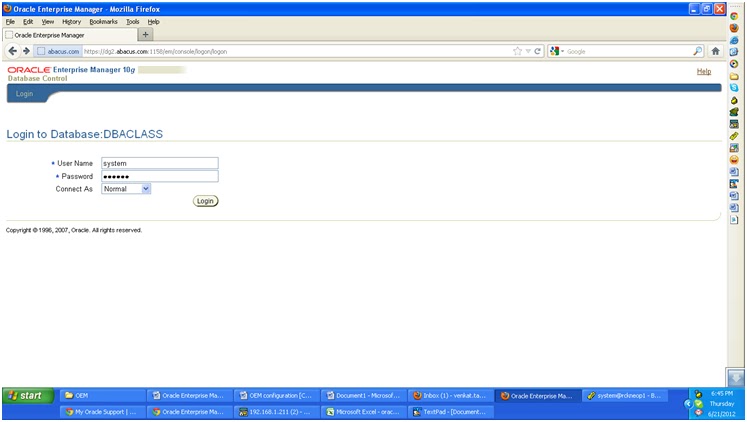
5.       Open the browser in the client system. and https://hostname:port/em/ in our case it is https://dg2.abacus.com:1158/em

      
  Screen1—log in page       


    Screen2—license agreement.
                             
   Click on the I agree button

  Screen3—


Thursday, 12 April 2012

What happens when the database is in Begin backup mode?


What happens when the database is in Begin backup mode?

When a hot backup runs in the oracle, first we will make the database in begin backup mode and then we copy the database files to tape or disk. The question that most of us will have is: what happens to the datafiles when the database is in begin backup mode?
Offline? Or frozen? Answer is No.
“Some of the Oracle books contains that the database files are not writable during the backup mode and the changes are stored in the SGA, redo logs and Rollback segments. And these changes will be the written into the data files when the database is taken out of begin backup mode. “
But the above predictions are opposed. It does not stop writing to the data files. The database almost works in normal way when the database in the backup mode. It can be summarized in as follows:
·         DBWn process writes  out all the dirty blocks of a particular SCN, i.e. when a check point process runs, the DBWn process writes all the blocks related to that SCN generated.

·         CKPT process stops updating the checkpoint SCN field in the data files headers and   begins updating the Hot backup checkpoint SCN field in the data files headers.

·         LGWR process begins logging of the changed blocks.

By freezing the checkpoint SCN in the data file headers, any subsequent recovery on that particular hot backup will know that it must commence at that SCN. Having an old SCN in the file header tells recovery that the file is an old one, and that it should look for the archivelog containing that SCN, and applies recovery starting there.

Here we need to know that in hot backup mode the checkpoints to data files are not suppressed. The main checkpoint flag is frozen, but the hot backup Checkpoint SCN will be updated in the file header.


SQL> create table student(name varchar(20));

Table created.


SQL> select * from tab;

TNAME                          TABTYPE  CLUSTERID
------------------------------ ------- ----------
DEPT                                       TABLE
EMP                                        TABLE
BONUS                                  TABLE
SALGRADE                      TABLE
T1                                            TABLE
STUDENT                        TABLE
RAMA                                    TABLE

7 rows selected.

Insert some values into the student table:

SQL> insert into student values('venkat');

1 row created.

SQL> commit;
Commit complete.


SQL> alter system checkpoint;

System altered.


Check the block number and the datafile in which the data is stored.

SQL> select dbms_rowid.rowid_relative_fno(rowid) file_num,dbms_rowid.rowid_block_number(rowid) block_num, name from student;   

  FILE_NUM  BLOCK_NUM NAME
----------           ----------          --------------------
         4            68                    venkat

Check the data in the block number 68 with the dd command:

[oracle@dg2 ~]$ dd bs=8k skip=68 count=1 if=/u02/oradata/DBACLASS/users01.dbf |strings
1+0 records in
1+0 records out
8192 bytes (8.2 kB) copied, 6.9861e-05 seconds, 117 MB/s

Insert another row, commit the transaction and check the block and file information:

SQL> insert into student values('ram');

1 row created.

SQL> commit;

Commit complete.

SQL> select dbms_rowid.rowid_relative_fno(rowid) "file num", dbms_rowid.rowid_block_number(rowid) "block num",name from student;

  file num  block num NAME
----------     ---------- --------------------
         4         68         venkat
         4         68         ram

Make the database in Backup mode:

SQL> alter tablespace users begin backup;

Tablespace altered.

Update the record in the student table:

SQL> update student set name='rama krishna' where name='ram';

1 row updated.


[oracle@dg2 ~]$ dd bs=8k skip=68 count=1 if=/u02/oradata/DBACLASS/users01.dbf |strings
1+0 records in
1+0 records out
8192 bytes (8.2 kB) copied, 6.5554e-05 seconds, 125 MB/s
ram,
venkat


Run the checkpoint process which creates an SCN and invoke the DBWn process to write the changed blocks to the datafiles:
SQL> alter system checkpoint;

System altered.

Now extract the information in the 68 block of that particular data file. We can observe that the changes made to the table (database) are written into the data file during the backup mode.

[oracle@dg2 ~]$ dd bs=8k skip=68 count=1 if=/u02/oradata/DBACLASS/users01.dbf |strings
1+0 records in
1+0 records out
8192 bytes (8.2 kB) copied, 7.0099e-05 seconds, 117 MB/s
rama krishna,
ram,
venkat


So, it is clear that the data files can be writable during the hot backup mode.

End the tablespace backup mode.

SQL> alter tablespace users end backup;

Tablespace altered.


Wednesday, 28 March 2012

Buffer Cache Hit Ratio goes down to Negative values


Today I faced an interesting issue in my production database. Daily we check the Buffer Cache Hit Ratio of the database. Today I got the negative value for the hit ratio.
I am using the below formula for calculating the buffer cache hit ratio.

                                               PHYSICAL_READS
               1  -   ------------------------------------------------------
                                DB_BLOCK_GETS + CONSISTENT_GETS

               
I tried with different formulae that I got from the google. But it is of no use. The I searched it in the metalink and I got the answer in it. It was a bug 2645071 stated in the 'Oracle Database Performance Tuning Guide 10g Release 1 (10.1)'  and found the  correct formula to calculate the Buffer Cache Hit Ratio

                                      'physical reads cache'
             1 - -----------------------------------------------------------------------------
                       'consistent gets from cache' + 'db block gets from cache'

.
Where,
‘physical reads cache’=’physical reads’-‘physical reads direct’-‘physical reads direct(lob)’
‘consistent gets from cache’= ‘consistent gets’
‘db block gets from cache’= ‘db block gets’

physical reads direct:
  This Oracle metric is the number of reads directly from the disk bypassing the buffer cache. For example if there is any request for large data, data-intensive operations such as parallel query, reads of the disk blocks bypass the buffer cache to maximize the transfer rates.
High disk reads indicates the small db buffer cache size.

Tuesday, 27 March 2012


ORA-00202: control file: ''
ORA-27036: translation error, unable to expand file name
ORA-205 signalled during: ALTER DATABASE   MOUNT...


I have an issue in my development database today. Suddenly client ping me and told that he cannot able to access the database.  He got the below error.


I checked the database is in archive log mode and the archive log destination is used 100%(Disk space). This database  was created using the RMAN duplication technique. To make the database in noarchive log mode I shutdown the database and tried to up database in mount state.

SQL>startup nomount;

ORA-205 signalled during: ALTER DATABASE   MOUNT...

SQL>select instance_name, status from v$instance;

INSTANCE_NAME    STATUS
---------------- ------------
RCKDEV1         STARTED


I checked the alert_log file of the database. In that I observed that the control_files parameter is set to nothing. i.e.

Control_files=


And I observed the command ALTER SYSTEM SET control_files='' SCOPE=SPFILE; that was done by the previous DBA. And the database is using the omf feature(ORACLE MANAGED FILES)

The database is using spfile. So, I created a pfile from the spfile:

SQL>create pfile from spfile;


Added the control­_files parameter in the pfile and started the database.


control_files=’/u02/ RCKDEV1/controlfile/o1_mf_7mpsghnh_.ctl’,’ /u01/ RCKDEV1
                           /controlfile/o1_mf_7mpsghln_.c tl’

SQL>startup mount;
SQL>alter database noarchivelog;
SQL>alter database open;
SQL>select  instance_name,status from v$instance;

INSTANCE_NAME    STATUS
---------------- ------------
RCKDEV1         OPEN


Insatallation of Cassandra database

Note: To Install the cassandra database, the server should be installed with JDK 1.6 or later version.

1.      Download the cassandra software from the website http://cassandra.apache.org. It will be named as  apache-cassandra-x.x.x-bin.tar.gz, where x.x.x is the release of the product
  
2.        Unzip and untar the file using the below command.

#tar -zxvf apache-cassandra-1.0.8-src.tar.gz

3.       Create the below directories.

  * cd apache-cassandra-$VERSION
  * sudo mkdir -p /var/log/cassandra
  * sudo chown -R `whoami` /var/log/cassandra
  * sudo mkdir -p /var/lib/cassandra
  * sudo chown -R `whoami` /var/lib/cassandra
 
 
4.       Download the Apache ant software to build scripting language and Ivy plugin for dependancy management. The Apache ant software can be downloaded from the http://ant.apache.org website
  
5.      Extract the zip file as below.

#unzip apache-ant-1.8.3-bin.zip

  
6.      Download the Ivy plugin software from the http://ant.apache.org/ivy/download.cgi website.

7.       Extract the zip file.

#unzip apache-ivy-2.2.0-bin-with-deps.zip

               Note:There is no need to download the ivy software(6&7 steps) seperately.

8.      Navigate to apache-ant-1.8.3 and fire the below command.

   #cd apache-ant-1.8.3  
   #svn co https://svn.apache.org/repos/asf/ant/ivy/core/trunk ivy
               
The above step is building from the source, here we get the latest sources from the    subversions.
  
9.       Navigate to the Cassandra source directory (Cassandra home) i.e. /root/apache-cassandra-1.0.8-src in this example and fire the below command:
  
#cd /root/apache-cassandra-1.0.8-src


run the ant command which in the ant extracted software location-->bin directory from the Cassandra source directory

#/root/apache-ant-1.8.3/bin/ant (in this example)

   
 Because Ivy takes care of all the dependencies, it’s easy to build Cassandra once you have the source. Just make sure you’re in the root directory of your source download   and execute the ant program, which will look for a file called build.xml in the current directory and execute the default build target. Ant and Ivy take care of the rest. To execute the Ant program and start compiling the source, just type above command:
  
10.   At last you will see BUILD SUCCESSFUL message appeared on the screen and the location of the new property file which is similar to below.

createVersionPropFile:
     [propertyfile] Creating new property file: /root/apache-cassandra-1.0.8-src/build/classes/main/org/apache/cassandra/config/version.properties


11.   Now we can start the cassandra database using the below command from the CASSANDRA_HOME.

    #cd apache-cassandra-1.0.8-src/
    #bin/cassandra

                  In the end of the process, it is similar to the below message:
     INFO 14:38:02,250 Using synchronous/threadpool thrift server on localhost/127.0.0.1 : 9160
     INFO 14:38:02,254 Listening for thrift clients...


Now the cassandra is up and running

12.   Start the cassandra client.
#bin/cassandra-cli
   
     o/p:
Welcome to Cassandra CLI version 1.0.8-SNAPSHOT

Type 'help;' or '?' for help.  Type 'quit;' or 'exit;' to quit.
 [default@unknown]